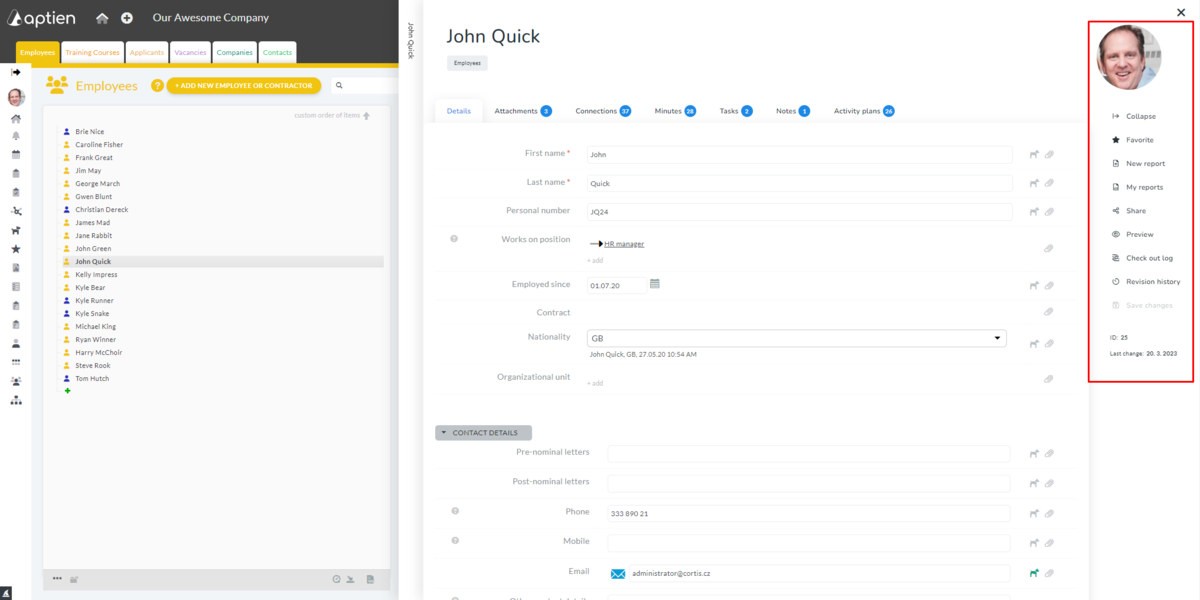
Top of item tab and action menu
If you need to change
the item name hover over the item name and the pencil icon "Edit"
will appear, when clicked the item settings will open.
To set the item image
click on the image icon, then a menu will open to change the item image or
photo.
Below the item image
on the right you will find a menu of actions and reports that can be used for
the item:
- Collapse - when you click this button, the menu closes and only the icons remain available, giving you more room to work.
- Favorite - Select to
add the item as a favorite.
- New Report - Clicking
on it allows you to select and run the desired report for the item.
- My Reports - opens a
list of reports generated for the organizer
- Share - There are
multiple actions to choose from: "Send a notification", which will open a new
window where you select the user and the message you want to send them with an
alert for the item. "Copy link to clipboard" will copy the link to
the item to your clipboard. Clicking "Share with guests" will open a
new window where you can invite guests to the item.
- Preview - here you can
see a printable preview of the item information
- Check out log - this
will open a report with digital handover logs
- Revision history - opens
a list with the history of changes to the item
- Save Changes - this
button is used to save the information for the item, if you have not made any
changes to the Details tab this button is inactive, after making a change to
the item the button will appear and turn orange
- ID - indicates a
unique numeric code assigned by the system, you can use for example for
importing
- Last change - date of
last change (last record in the change history)
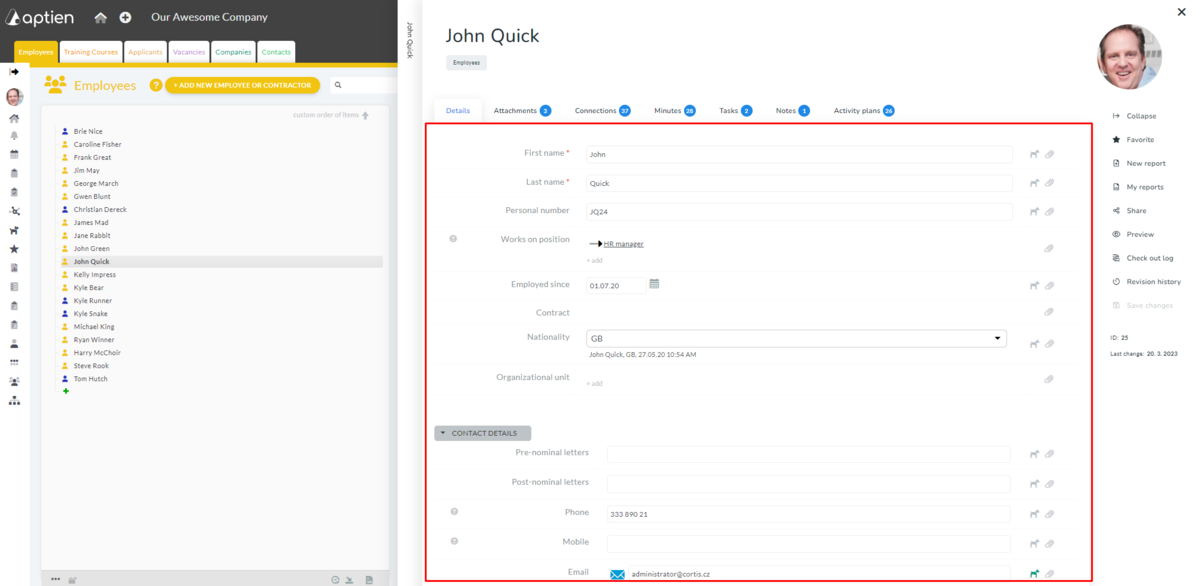
Details include information about the item
The tab ‘Details’ includes separate fields in which you can input information.
To the left side of the detail, you will find a question mark with help on filling in the field. Next, you will find the name of the detail and next to it a field for information input. If you are in the administrator’s role, you will find a pen in between the name of the detail and the input field, which will open the menu for detail editing.
You will find a task icon on the right, where you can view all the tasks connected to the given detail, or you can create a new task. Next is a dog icon, which will show you all the Watchdogs set for the item. You can also create new Watchdogs. The paperclip will show the details attachments, or you can add new ones. If any of these icons are displayed in a green color, something has already been added.
There are also groups of details in this tab, which you will recognize by the arrow with a sub title for the group of details. You can view or hide a group by clicking on the sub title or the arrow. If you are in the administrator’s role, you can again see a pen’s icon, which will open the given detail’s group settings.
At the bottom left, under all the details, you will, as an administrator, find a blue plus sign, which is used for a new detail addition.
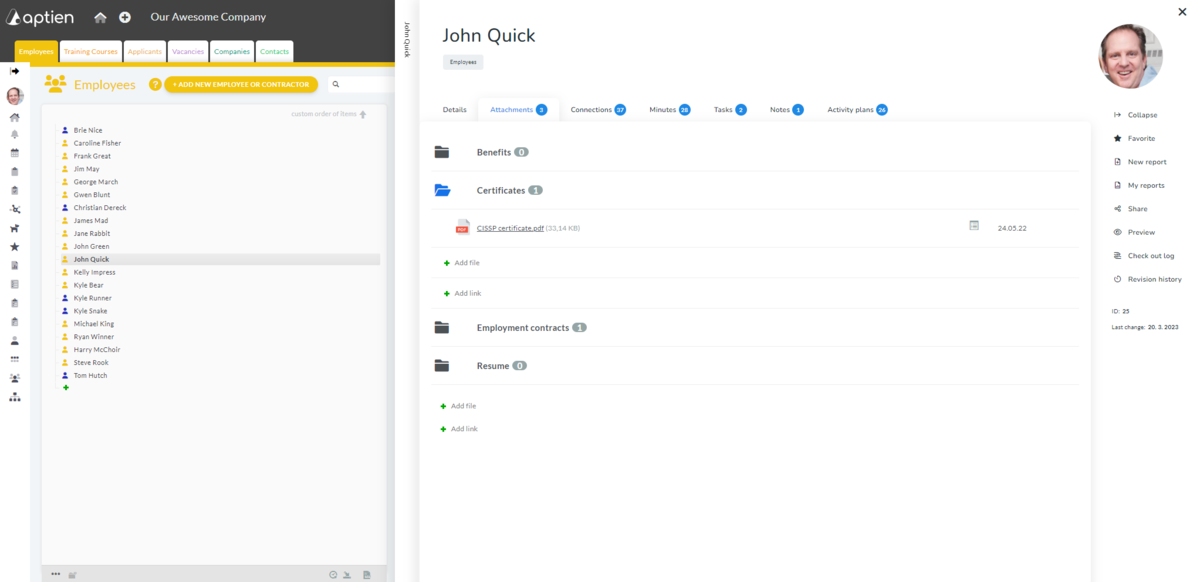
You can upload anything into the attachments
The tab ‘Attachments’ includes all attachments and links you uploaded or added to the item.
By clicking on the link or attachment, you will open it. By clicking on the document’s icon in the column 'Details’, you will open a window for attachment editing, where you can change a name or folder for attachments.
Underneath all attachments on the left side, you will find ‘add link’ or ‘add an attachment’. If you are in the administrator’s role, you have an option to create folders for attachments.
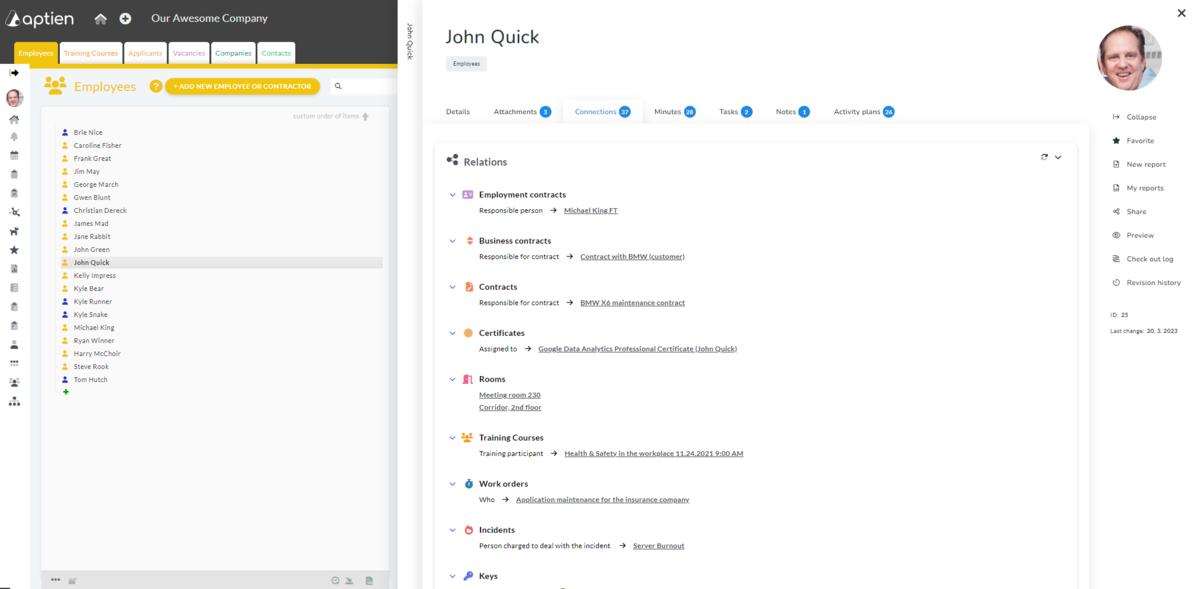
Connections interlink the entire system
The tab ‘Connections’ includes all connections to the given item.
Connection’s standard setting is set to see separate Organizers, and after opening them, you will see all the connections. You can change the view by clicking on the eye icon on the left and picking one of the options. The change will be done immediately, and you can always go back to the original. The icon next to the eye will allow you to view the connections in the form of a chart. You can switch it on and off at any time.
You can add a Connection by clicking on ‘Add new’, which will display a list of organizers, to which you have access to and from which you can pick. You can also add a connection to the Organizer by clicking on the green plus sign next to the Organizer’s name. By using this option, you will be picking directly from the list of organizer's items.
By clicking on the name of the item, you will open it. You will open settings by clicking on the pen icon in the square on the right side or the left side's blue arrow. On the right side of the Connection, under a clock icon, you can view a history of the Connection, and by using the bin icon, you can delete it.
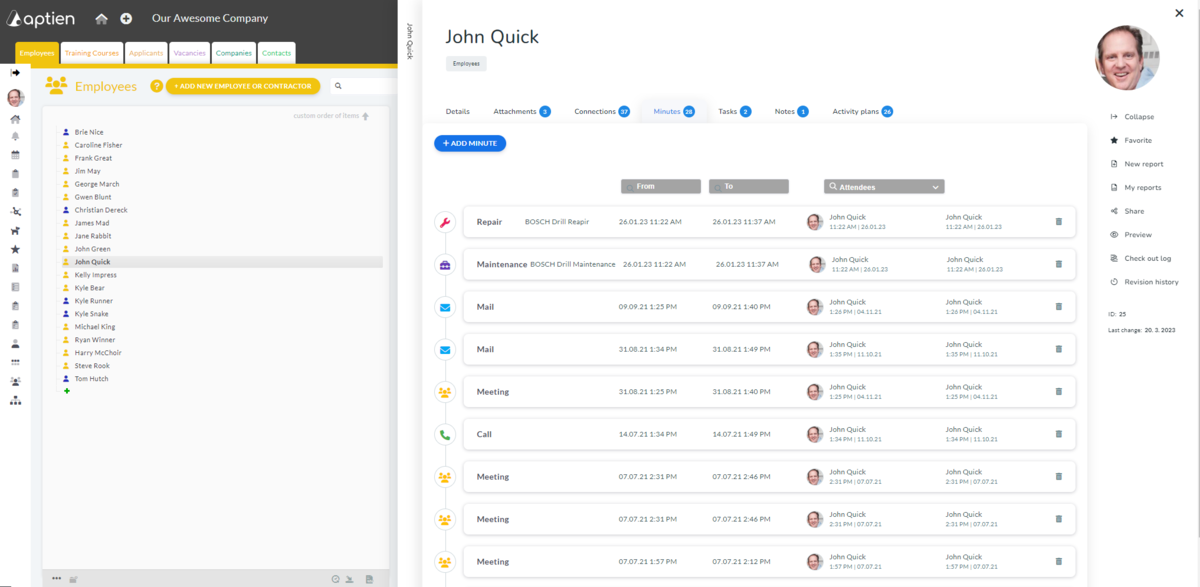
Minute document events from the past
The tab ‘Minutes’ includes all the records or events connected to the given item.
By clicking on the "+ add minute" button, you will open a new record’s window. You can add it by clicking on the blue ‘Save’.
You can open an existing minute by clicking the icon on the left side underneath the add button or hovering over and clicking. On the right side you will find the trashcan to delete the minute. The system will ask you one more time to make sure you want to delete the record.
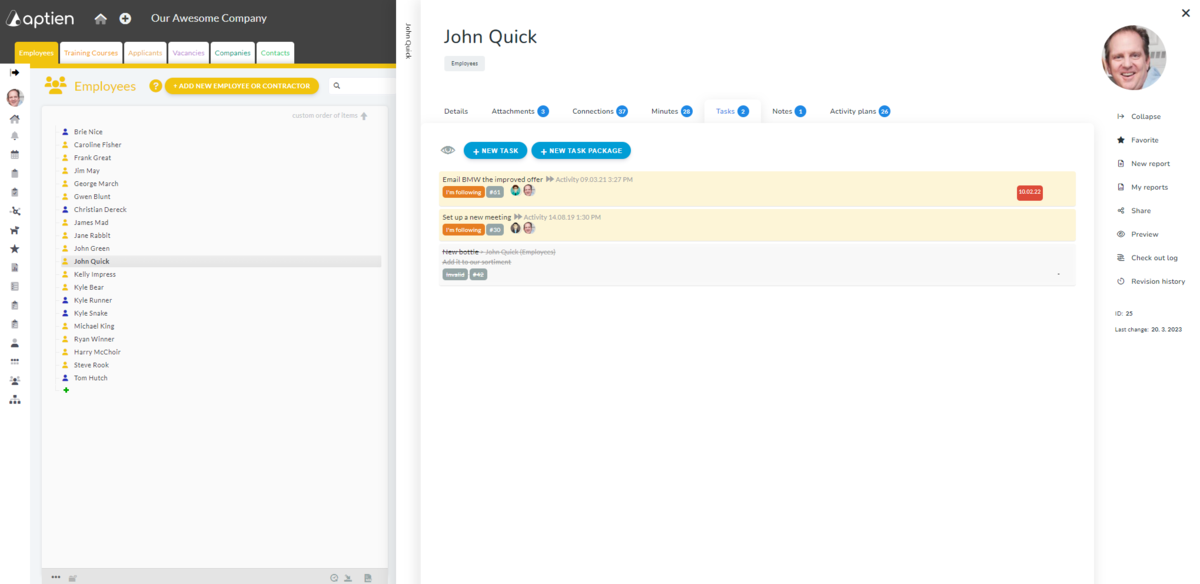
The item's tasks overview
The tab ‘Tasks’ includes all the tasks, which are paired to the given item.
You can open tasks by clicking on them.
By clicking on ‘+ New Task’, a window will open to create a new task associated to the item. The same goes for a ‘Task package’, which will open a new group window. The eye on the left side of the groups will open a menu of filters. You can change the filter at any time.
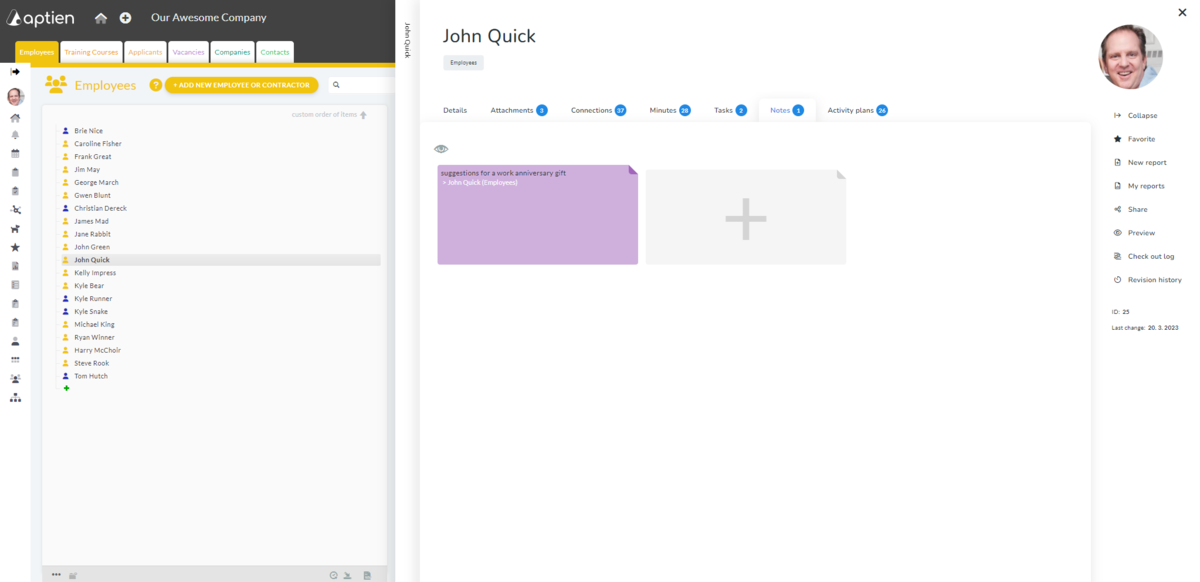
Ideas and thoughts connected to the item
The tab ‘Notes’ includes all the notes that are connected to the given item.
You can open a note by clicking on it. By hovering over the note, an arrow will display in the top right corner, which will show a menu. You can choose ‘Edit’, and the note will open, or you can choose ‘Share’, and then the note is shared, or you can delete it. The system will always ask you again if you want to delete the note.
You can also create a new note by clicking on the grey box with a large + on it.
